The Ultimate Guide to Installing, Using and Wiring 12 Volt Garden Lights
What are 12 Volt Garden Lights?
12 Volt Garden Lights are low-voltage lights that use 12 volts of electricity to operate. They are commonly used for outdoor lighting, especially in gardens, pathways, and patios. Unlike traditional high-voltage lighting, 12 Volt Garden Lights are much safer to use and can be installed easily without the need for an electrician. They are available in a variety of styles and come in different shapes and sizes to suit your garden's specific needs.
How do I choose which lights I need?
You need to determine which outdoor lights are right for you. Walk around your property, look outside your windows and entrances. Think about mood, safety, glare and your neighbours. Balancing light and and subtlety is very important as well as highlighting features of your landscape. Some things you should consider:
- Determine your lighting goals: Consider what you want to achieve with your garden lighting. Do you want to illuminate pathways, highlight garden features, or create a mood?
- Measure your space: Measure the areas you want to illuminate, taking note of the distances and dimensions.
- Consider the brightness: Look for lights with appropriate brightness levels for your needs. Too bright or too dim lights may not serve your purpose.
- Choose the right type of lights: There are different types of 12-volt lights for gardens, including path lights, spotlights, floodlights, and accent lights. Choose the type of lights that suit your needs and desired aesthetic.
- Consider the material and design: Look for lights that are durable and weather-resistant, especially if you live in an area with harsh weather conditions. The design should also complement your garden's style.
- Check the power source: Ensure that your lights are compatible with your power source and any additional accessories you may need, such as a transformer.
- Set a budget: Consider your budget and choose lights that fit within your price range while still meeting your lighting goals.
Why would I choose low voltage lights for my landscape design?
There are several reasons why you might choose low voltage lights for your landscape design:
- Safety: Low voltage lighting systems operate at 12 volts, which is much safer than the 240 volts used in standard household lighting systems. This makes them a safer option, especially in areas where children or pets may be present.
- Energy Efficiency: Low voltage lights use less energy than traditional high voltage lighting systems, which means they can help you save money on your electricity bills. They are also more environmentally friendly, as they produce less greenhouse gases and are less wasteful of electricity.
- Flexibility: Low voltage lighting systems are easy to install and can be added to existing landscapes without major changes. They also come in a variety of styles and designs, allowing you to customize your lighting scheme to suit your specific needs and aesthetic preferences.
- Durability: Low voltage lights are designed to be durable and long-lasting, making them ideal for outdoor use. They are resistant to corrosion, moisture, and other weather conditions, which means they can withstand the elements better than high voltage lights.
- Security: Low voltage lights can be used to enhance the security of your home and property by illuminating dark areas and discouraging intruders.
Warning You can't just connect low voltage lights to your household current. You must run them through a transformer called an LED Driver.
How do I choose the right driver for my low voltage lights?
Choosing a driver for your landscape is easy so long as you follow these simple steps:
- Determine your lighting needs: Consider the number of lights you need to power and the total wattage required. This will help you choose a driver with the appropriate voltage and current output.
- Check the compatibility: Check the specifications of your lights to ensure they are compatible with the driver you are considering. Ensure that the driver's voltage output matches the voltage requirements of your lights.
- Calculate the total wattage: Calculate the total wattage of your lights by adding up the wattage of each light. Ensure that the driver's wattage rating is higher than the total wattage of your lights.
- Choose the appropriate type of driver: There are two types of drivers - constant voltage drivers and constant current drivers. Choose the appropriate type based on your lighting needs. For low voltage landscape lighting, a constant voltage driver is typically used.
- Consider the quality and reliability: Choose a driver from a reputable manufacturer with a proven track record of producing quality and reliable products. This will ensure that your driver lasts for a long time and provides consistent performance.
- Choose the appropriate enclosure: Choose a driver with the appropriate enclosure to protect it from moisture and other outdoor elements. Look for drivers with IP ratings that indicate their level of protection against moisture and dust.
How do I calculate the Wattage of the driver that I need?
- Step 1. Add the wattage of all the lights. For example if you are planning to use five 20W lights then the total wattage is 100W.
- Step 2. If you have cables running from the driver, multiply the total wattage by 1.1 to allow for loss due to cable distance. In this case it would be 100 x 1.1 = 110W.
- Step 3. Choose a driver that has a wattage rating of roughly 20% more than what you need. In this case you would purchase a driver rated at about 110 x 1.2 = 132W.
Tip Outdoor drivers plug into your 240V household current, and drive your low voltage lights.
Tip Driver wattages are often shown as Volt-Amps (VA).
Tip Your driver's maximum rating should be at most double your total wattage. In this case your driver should be 220W or less.
Tip The wattage of a light is determined by the globe that is installed in it, not by the rating of the light fitting.
Warning Your driver's minimum rating should be your total wattage. NEVER connect lights whose total wattage exceeds your driver's rating. In this case this means that the driver's rating must be 110W or more.
What happens if my lights are too far away from the driver?
If a light is too far from the driver, then it may cause the light to become dim due to voltage drop. You can reduce this in three ways: by improving your wiring method, using heavier gauge cables or by installing a higher rated driver.
Tip Make sure your connections are high quality across the entire circuit, as low quality connections will cause contact problems.
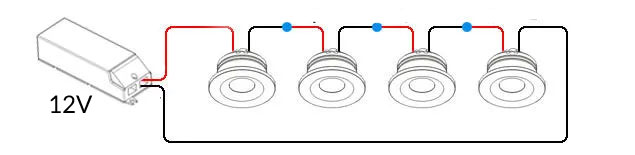
Warning The series wiring method - also known as daisy chain - is the easiest and cheapest solution, where all your lights are connected directly to the driver in a continuous chain. However this is the wiring method that will cause the furthest voltage drop across the chain, and so each light in the sequence will get progressively dimmer. You should try to avoid this method if possible.
Tip The parallel wiring method avoids voltage drop and ensures even brightness in all the lights.
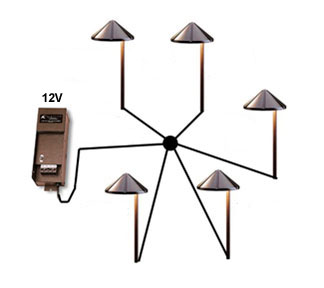
Tip The junction wiring method - also known as a hub - can reduce voltage drop. Here all the lights are connected to a central hub, which is then connected to the driver. The hub should be be buried in a roughly central location to the lights but the lights do not need to be equidistant from the hub. The trick here is to ensure that the wire length between the hub and each light is the same, with any extra wire length buried near the fixture and never cut. This ensures even brightness in all the lights. The hub is suitable for circular drive ways or paths where dimming would be noticeable.
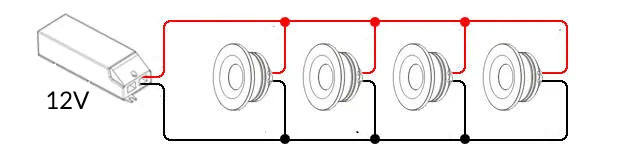
Tip The circular wiring method - known as a loop - connects the last light back to the driver. The voltage drop occurs on both sides of the loop so will produce a more uniform light output.
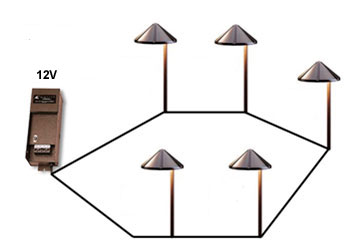
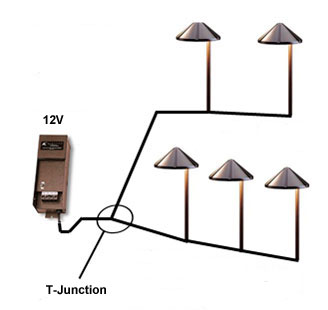
Tip The split wiring method - also known as the T-junction - connects the lights by having two runs of cable out of a central point that are connected to a T-junction. This improves the voltage drop for lights that are further away.
Where should I install my driver?
The best location is as far away from rain as possible but with access to your AC current. Good locations include the garage, shed or under a roof eve.
What tools and materials will I need for installing 12 volt garden light?
Installing 12 volt garden lights requires some basic tools and materials. Here are some of the tools and materials you may need:
Tools:
- Screwdriver (flathead and Phillips head)
- Wire cutters
- Wire strippers
- Pliers
- Drill with drill bits
- Spade shovel or post hole digger
- Tape measure
- Level
Materials:
- 12 volt garden lights
- Low voltage landscape wire
- Transformer
- Waterproof wire connectors
- Landscape stakes
- Timer or photocell
- Electrical tape
It's important to ensure that all materials are rated for outdoor use and are suitable for the specific installation requirements. Additionally, it may be necessary to obtain any necessary permits or consult with a licensed electrician for more complex installations.
What is a Step-by-step guide on how to install garden lights?
- Plan the lighting layout: Determine the location and spacing of the garden lights, keeping in mind the purpose of the lighting and the amount of light needed in each area.
- Install the transformer: Install the transformer near a power source and connect the low voltage landscape wire to the transformer's terminals.
- Run the low voltage landscape wire: Run the low voltage landscape wire from the transformer to each light location, ensuring that there is enough wire for each light.
- Install the garden lights: Install each garden light by placing the light fixture in the desired location and securing it with a landscape stake. If necessary, use a spade shovel or post hole digger to create a small hole for the stake.
- Connect the garden lights: Strip the ends of the low voltage landscape wire and connect them to the corresponding wires on each garden light using waterproof wire connectors. Ensure that the connections are secure and properly sealed with electrical tape.
- Test the garden lights: Turn on the transformer and test each garden light to ensure that they are functioning properly.
- Set up a timer or photocell: If desired, set up a timer or photocell to automatically turn on and off the garden lights at specific times or in response to daylight levels.
- Bury the low voltage landscape wire: Bury the low voltage landscape wire using a spade or garden hoe, ensuring that the wire is buried at least 6 inches deep and is not in danger of being damaged by garden tools or digging.
What gauge cable do I use to for different runs of 12 Volt lights?
Cable gauge is a measure of the thickness of the cable. The gauge is determined by the diameter of the metal wire inside the cable. The lower the gauge number, the thicker the wire and the more current it can carry without overheating. This is important because if the cable is too thin for the load, it will overheat and could cause a fire or damage your lights.
The general rule of thumb is to use a thicker gauge (lower number) cable for longer cable runs and higher wattage loads. Here are some general guidelines for choosing the right gauge cable for different runs of outdoor lights:
Cable Run Length:
The first factor to consider is the length of the cable run. As a general rule, the longer the cable run, the thicker the gauge cable you should use. Here are some guidelines:
- For a cable run of up to 50 feet (15m), you can use 16-gauge cable.
- For a cable run of up to 100 feet (30m), you should use 14-gauge cable.
- For a cable run of up to 150 feet (45m), you should use 12-gauge cable.
- For a cable run of up to 250 feet (75m), you should use 10-gauge cable.
Total Wattage of Light:
The second factor to consider is the total wattage of the lights that will be connected to the cable. The higher the wattage, the thicker the gauge cable you should use. Here are some guidelines:
- For a total wattage of up to 400W, you can use 16-gauge cable.
- For a total wattage of up to 1200W, you should use 14-gauge cable.
- For a total wattage of up to 2500W, you should use 12-gauge cable.
- For a total wattage of up to 4000W, you should use 10-gauge cable.
Voltage Drop:
Another factor to consider when choosing the right gauge cable for outdoor lighting is voltage drop. Voltage drop is the reduction in voltage that occurs as electricity flows through the cable. If the voltage drop is too high, the lights may not work properly or may be dimmer than expected.
To minimize voltage drop, you should choose a cable with a low resistance. This means choosing a thicker gauge cable or using multiple smaller cables in parallel. You should also try to keep the cable run as short as possible.
Current: Finally, you should also ensure that the cable does not carry more current than it is designed for, otherwise can overheat and cause a fire.
What are the main tips for avoiding common installation mistakes of 12 volt garden lights?
Tip Properly bury the low voltage landscape wire: Make sure to bury the wire at least 6 inches deep to avoid damage from gardening tools or accidental digging. It's also important to avoid burying the wire too close to other electrical cables or water lines.
Tip Use waterproof wire connectors: Waterproof wire connectors are essential for preventing moisture from entering the connections and causing corrosion or electrical issues.
Tip Check the voltage drop: The voltage drop is the reduction in voltage that occurs as the electricity travels along the wire. To avoid a significant voltage drop, make sure to use the proper gauge of wire for the length of the wire run and the wattage of the lights.
Tip Follow the manufacturer's instructions: Each garden light and transformer may have specific installation instructions and requirements, so make sure to carefully read and follow the manufacturer's instructions.
Tip Use high-quality materials: Using high-quality materials, such as durable garden lights and weather-resistant wire, can help ensure that your lighting system is reliable and long-lasting.
Tip Consider consulting a professional: If you're unsure about any aspect of the installation, it may be helpful to consult a licensed electrician or professional landscaper for assistance.
Tip Plan your layout: Before you start wiring your garden lights, create a plan for where you want to place them. This will help you determine the amount of wire you need and where to place the transformer. It will also prevent you from making unnecessary cuts or splices in the wire.
Tip Use the right gauge wire: The wire you use should be appropriate for the length of the run and the amount of power required by your garden lights. The longer the wire run, the thicker the wire should be. For example, for runs up to 100 feet, use 12-gauge wire. For runs up to 150 feet, use 10-gauge wire. Check the manufacturer's instructions for the recommended wire gauge.
Tip Connect wires securely: When connecting wires, make sure they are securely twisted together and covered with waterproof connectors or electrical tape. Loose connections can cause the lights to flicker or go out.
Tip Protect wire from damage: Make sure the wire is protected from damage by burying it at least 6 inches deep or by running it through conduit. Avoid running the wire through areas where it could be damaged by lawnmowers or other garden equipment.
Tip Use a transformer: Garden lights require a transformer to convert the 240-volt power from your home to 12 volts for the lights. Make sure you use a transformer that is designed for outdoor use and has a capacity that matches the total wattage of your lights.
Tip Follow safety guidelines: Always turn off the power before working on wiring. Don't overload circuits or exceed the wattage capacity of the transformer. And don't use damaged or frayed wires.
Tip Test your wiring: Once you've completed your wiring, test the lights to make sure they are working properly. If you notice any problems, go back and check your connections.
How to maintain and clean your garden lights?
Maintaining and cleaning your garden lights is important to ensure that they continue to work properly and look their best. Here are some steps you can follow:
- Inspect regularly: Check your garden lights regularly to make sure they are functioning properly. Look for any signs of damage, such as broken glass or rusted metal, and replace or repair as necessary.
- Clean the lenses: Over time, the lenses on your garden lights may become dirty or foggy, which can reduce their brightness. To clean them, use a soft cloth or sponge and a mixture of mild soap and water. Be gentle, and avoid using abrasive cleaners or scrubbers that could scratch the lenses.
- Remove debris: Leaves, dirt, and other debris can accumulate around your garden lights, which can block the light and reduce its effectiveness. Remove any debris from around the lights regularly, and use a small brush or compressed air to clean the light fixtures themselves.
- Adjust the positioning: If your garden lights are adjustable, make sure they are aimed correctly to provide the best lighting coverage. You may need to adjust the angle of the lights as the seasons change or as your landscaping grows.
- Check the wiring: Inspect the wiring and connections periodically to make sure they are secure and free from damage. Repair any loose or damaged wires immediately, and make sure the connections are waterproof and protected from the elements.
- Replace bulbs: If a bulb burns out, replace it promptly with a new bulb of the same type and wattage. Make sure the power is turned off before changing the bulb, and avoid touching the glass with your bare hands, as the oils from your skin can damage the bulb.
What are common problems with 12 volt garden lights and how do I fix them?
- Here are some common problems with 12-volt garden lights and how to fix them:
- Lights not turning on: This could be caused by a number of issues, including a blown fuse, a faulty transformer, loose wiring connections, or a bad light bulb. Check each of these components to identify the problem and make repairs as necessary.
- Lights flickering: Flickering lights could be caused by a loose connection, a bad bulb, or an overloaded circuit. Check the wiring connections and replace any faulty bulbs. If the problem persists, you may need to upgrade your transformer or adjust the number of lights on the circuit.
- Lights dimming or turning off: This could be caused by a voltage drop, which occurs when the distance between the transformer and the lights is too great or the wire gauge is too small. Check the wire gauge and length, and make sure the transformer is close enough to the lights to provide adequate power.
- Corrosion or rust: Over time, the metal parts of your garden lights may become corroded or rusted, which can affect their performance and appearance. To fix this issue, use a wire brush or sandpaper to remove the rust or corrosion, and then apply a rust-resistant coating.
- Water damage: If your garden lights are exposed to water, the wiring and other components may become damaged. To fix this issue, make sure your wiring is protected by waterproof connectors or conduit, and use lights that are designed for outdoor use.
- Insect infestation: Insects such as ants or bees may nest inside the light fixtures, which can cause damage to the wiring or other components. To fix this issue, remove any nests or insects from the fixture, and use an insect repellent to prevent future infestations.
By identifying and fixing these common problems, you can ensure that your 12-volt garden lights are functioning properly and providing the illumination and ambiance you desire in your outdoor space.
How do I extend the lifespan of my 12 volt garden lights?
- Choose high-quality garden lights: When shopping for garden lights, look for high-quality options that are designed to withstand outdoor conditions. Choose lights with durable materials and weather-resistant finishes to ensure that they can withstand rain, wind, and other elements.
- Use the right wattage: Using the wrong wattage can cause your lights to burn out prematurely. Make sure to use the recommended wattage for each light, and avoid using bulbs that exceed the maximum wattage specified by the manufacturer.
- Avoid overloading the transformer: Overloading the transformer can cause it to fail, which can in turn damage your garden lights. Make sure to use a transformer that can handle the total wattage of all your lights, and avoid adding too many lights to the system.
- Keep the fixtures clean: Dirt and debris can accumulate on your garden lights over time, which can reduce their effectiveness and shorten their lifespan. Regularly clean your garden lights with a soft cloth and mild soap, and avoid using abrasive cleaners or harsh chemicals.
- Check the wiring regularly: Loose or damaged wiring can cause your lights to malfunction or fail altogether. Make sure to inspect the wiring regularly and make any necessary repairs or replacements.
- Adjust the lighting schedule: Running your garden lights for too long can cause the bulbs to burn out more quickly. Adjust the lighting schedule based on the season and the amount of natural light in your area to avoid unnecessary wear and tear on the bulbs.
Note: this web page is a general guideline only, and readers should not rely on it, but need to verify all statements and information with qualified electricians. Lighting Style does not accept any liability for any injury, loss or damage incurred by use of or reliance on this information.